Saturday 27 August 2016


I have made it back......

First Post for Quite a While

Boy, hasn't time flown. I have been flat out like a lizard drinking. I won't bore you with details, sufficed to say it has been a very productive time.

Amongst other things, I have been painting up an 1805 Russian Column for our Huge game in January.
Every year we have a large battle from some of Napoleon's array of battles. This year we are doing Austerlitz, which is going to be played on our biggest table yet. It nearly takes up a 4 car garage.....

I volunteered to buy and paint the 1st Column, on the Left Wing. Darren bought all the figures from Elite Miniatures and all of the other volunteers and I paid him and got to work. This was done in January or February, I think.... anyway, a little while ago.

I only have 3 Regiments to finish (they are mostly done, just collar, cuffs, shoulder straps and head wear, with their proper pom poms etc.)
I will post some pics of them in the next couple of weeks.

Meanwhile, I have been up to some money saving additions to my figures.

Firstly, I was watching some Youtube videos on how to make your own flock and grass clumps etc. and had a brainwave.......yes I know that you are supposed to have a brain to have one of those.... but instead of using traditional materials.... I would use.....wait for it......Dog Hair......
I have 2 Border Collies and they shed an enormous amount of hair. It gets blown about by the wind and ends up in clumps all around the back yard. We usually sweep it up and throw it away, but I started wondering if I could utilise this resource. I decided to test my theory out.....


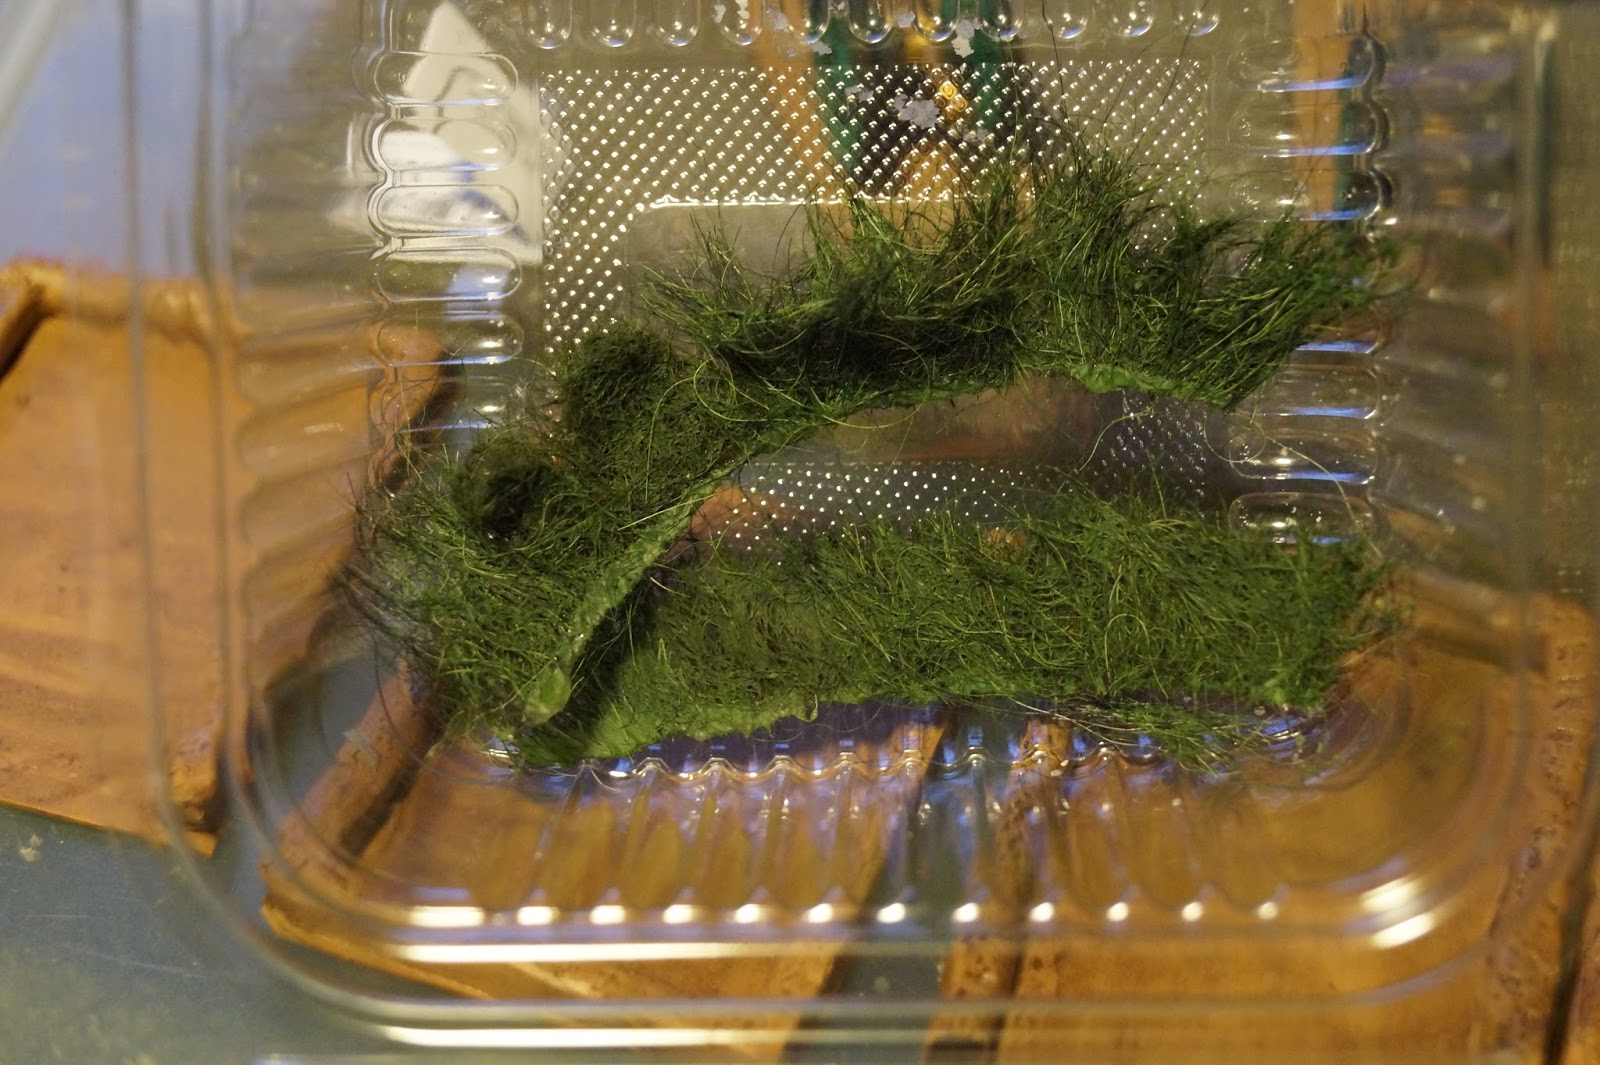
I clamped some of the dog's hair between to ice cream (or iced lolly or whatever you call them) sticks.


You can see the black and white hairs here


I grabbed an old Folk Art paint, this one is called "Green Meadow"


I added some cheap floor polish, which is just as good as Future Floor polish, to loosen up the old paint and thin it down.


I dragged and swirled the hairs in the paint and polish solution and let it dry


I cut them into small strips, clamped them again and dipped one end in some PVA glue so that the strip doesn't fall apart.


Once the PVA glue is dry, you just pull of a small section and glue it into place using a blob of PVA glue. You will have to support the tuft for a little bit until the glue dries a little bit.
I was very happy with the result. Now to find some more uses for this valuable, and natural resource.
Not that I am a cheapskate or anything........

Another project I have been working on is the tassels on the end of flag poles. I could pay to get proper "Metal" ones, but that is not the way I roll. I love making things, so I thought about making my own.


I went to our local Lincraft store (or it could be any shop that sells cross stitch cottons and cotton thread) and bought some that matched as closely as I could get it.


I am using the silver for the Russians and I can use gold for British and anybody else who uses gold tassels on their flags.


I first cut some lengths of the cross stitch cotton, about 6 cm.


then I cut some smaller bits, about 1 and 1/2 to 2 cm long.


2 bits for each end of the longer thread


and tied the 2 bits together


I then pulled them so that both ends of the smaller bits were at the same end


Like so


I then tied those smaller bits onto the ends of the longer threads, 


and tied the excess bits of cotton around and around the longer thread, like so


I super glued (or CA glued) the wound up excess cotton (trying hard not to stick my finger together)


Once the glue is dry, which won't take long, you may trim the ends to make them look a bit more in keeping with the scale


Like so


I super glued them to the flagpole, under the "Spike" of the flag, which I also made, from Tamiya Epoxy Putty


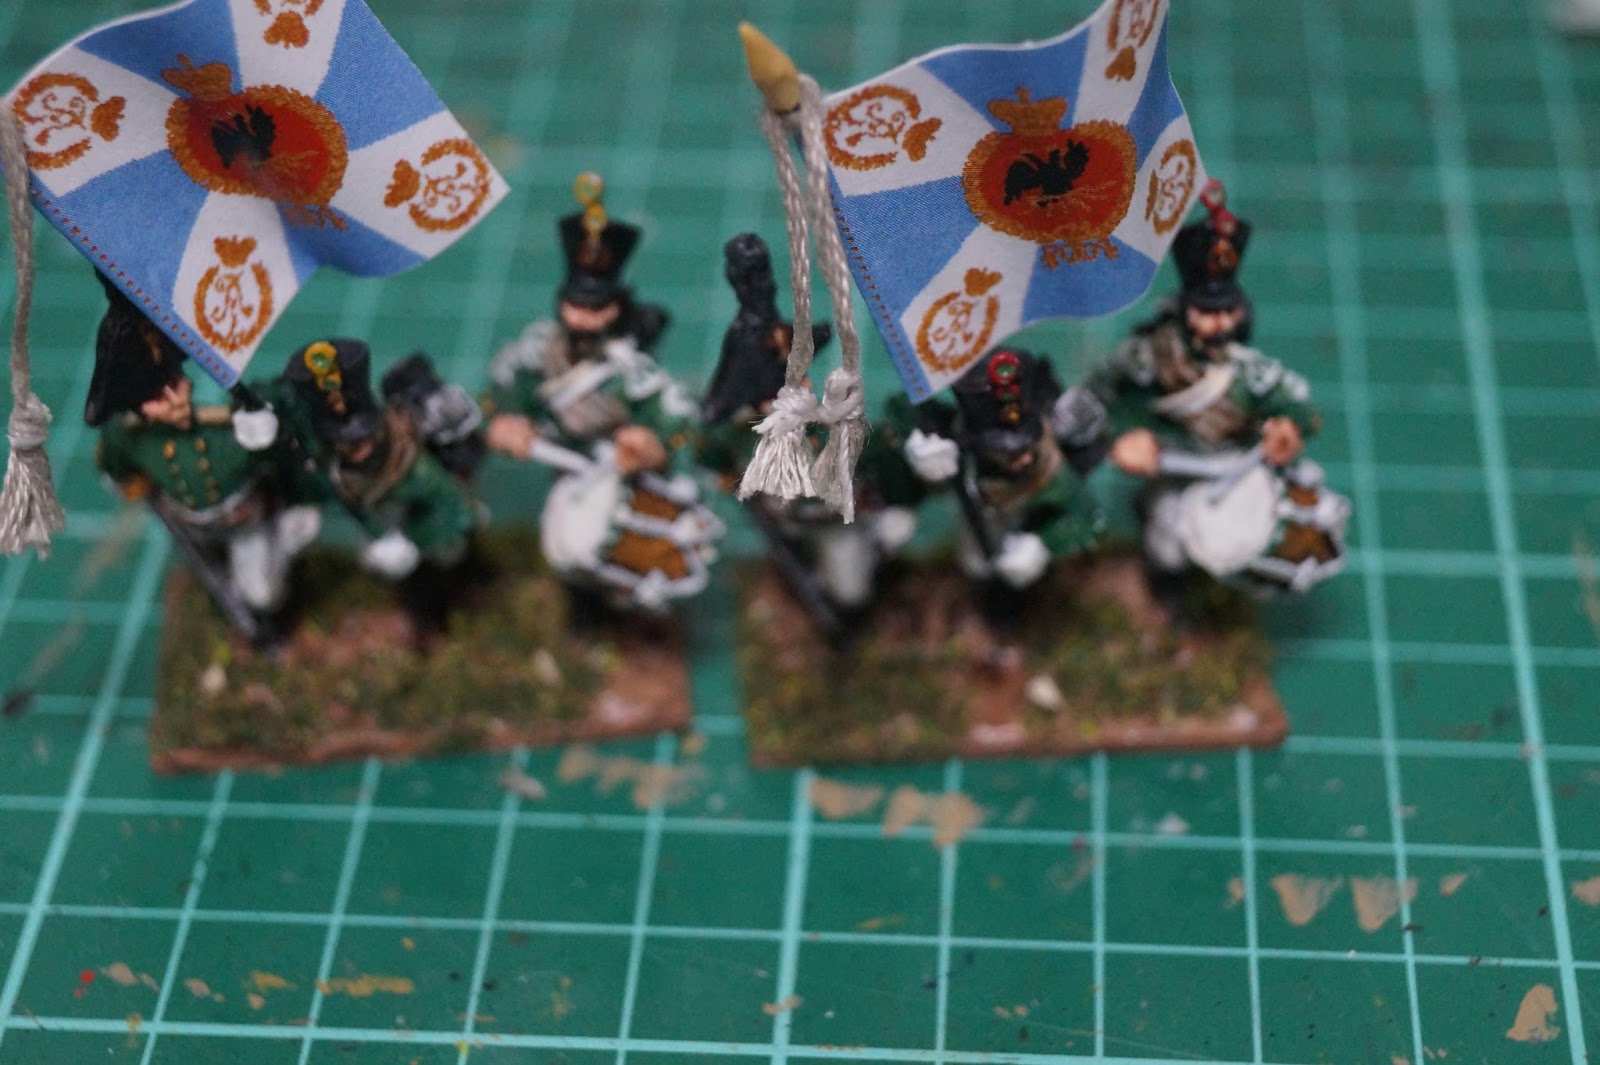
I then "painted" them with watered down PVA glue so that when they dry, they keep still


Here are some more pics to show you the result.


All in all, I was very pleased with my money saving techniques.

I will post some pics of my new Russians very shortly.

Until then,
Have fun everybody....and don't be scared to experiment,
Paul

Saturday 16 January 2016

Happy 2016 Everybody


New Year, New Game


I received an invitation from one of my re-enacting friends for a weekend of wargaming. I happily accepted and on the way picked up another friend, (yes, I have more than one friend) Jim. We then carried on to Ade's house, who has a room dedicated to wargaming. I was completely amazed and Ade showed me his collections, mainly 6mm and 10mm but also 15mm and 28mm. He has been wargaming and collecting for many years and has built up a great collection from a great many theatres of war.
He has made up lots of tables on wheels that are 2 feet by 2 feet. Each of which connect to each other with hooks, holding them firmly together. This is covered by a few thin cotton sheets, sewn together. His terrain is mainly hand made too, using many and varied techniques.

He asked if I would be interested in a World War 1 game 1914, on Facebook, to which I replied that I had never played WW1.
I didn't know until Jim told me on the way that we would be playing a 6mm game. I have never played a 6mm game before and thought it might be interesting.

Ade had made up the rules some time ago (I think he said about 12 years ago) and all the rules were written on an A4 sheet of paper, in landscape. He explained the rules briefly, and we started the game. He explained the movement and fire sections as we came to them. They were quite easy to follow, even though I am not a very experienced gamer. Jim and I had a pretty good handle on them after 2 or 3 moves.

The game was an introduction/practice game to show us how the game worked. There are about 8 - 10 players that will be invited to a "Big Battle" in June/July and he has started out by teaching us the game. The other players will hopefully get a chance to go and practice the game before then, to make it easier to play the game.

Jim and I played against Ade and we started from the edge of the board, with One Company of Infantry, in Four Platoons (Each Platoon had 4 bases of 5 infantrymen), One Squadrons of Hussars, in Four Troops (Each Troop had 2 bases of 4 cavalrymen), Two x Heavy Machine Guns and Two x 7.5 cm Howitzers.
We decided to split the Company, having 2 platoons of infantry each, 2 troops of cavalry each, Jim had the 2 HMGs and I had both the 7.5cm Howitzers.
The British force was not on the board when we began our move, so Jim and I came up with a brilliant strategy of Jim moving up the right road and I go up the left road, our Howitzers up the middle.
The British forces were then placed on the board and to our horror, they were waiting for us at the second line of hedges.
We then found out the harsh reality of not scouting the area with cavalry, just as they would in the early days of the conflict in 1914. We were too close with our infantry and artillery, the latter was lost after 4 moves without firing a shot.
The next major lesson we learned was that once you have written your Company Orders (Infantry) and Squadron Orders (Cavalry), you must follow them until runners can be sent (unless in base to base contact) up and down the Chain of Command. This can take a few moves, even if you roll the correct die number to activate the orders, more if you fail that roll. You must think of some contingencies when writing orders, in case something untoward happens.

If a unit is fired upon, they must roll to activate either movement or fire, which makes it very interesting if 3 out of 4 bases fail to activate..........oh the humanity.......

All in all though, it was an enjoyable set of rules and I am very keen to get a bit of practice in.
I am so keen in fact that I asked Ade for a copy of the rules, which he obliged. I cut the bases from some thick cardboard and painted the in German Uniform and British Uniform colours. I then made some scenery very cheaply using felt for roads, woods and ploughed fields. Hedges (of different sizes) and stone walls were cut from green scouring pads, the stone wall sections painted Light Grey For buildings, I used my Hot Wire Foam Cutter and went berserk on some off cuts of polystyrene foam. I painted the roofs different colours for the different cover levels.
The whole lot costing me about $10 (Aus) and a few hours of my time.....so about $2000 (Aus).... well maybe not quite that much.

I asked Jim if he wanted to come to my place (about 2 hours drive) for the weekend and have more practice. We had a practice match of WW1 and also a bit of a game of Napoleonic Black Powder, just to see what that game is like.
I must say that my dice let me down terribly with quite a few missed activations, bad rolls when firing and even worse rolls to save, when shot at. Jim, on the other hand, had a blinder, with an unheard of 20 and 10 on those respective dice.

We both learnt a few more aspects of the game and I am looking forward to more practice games in the near future.


Ade's table before we began


The British popped up from nowhere it seemed


The same British Infantry in a larger pic


Things weren't any better on Jim's side


They have the Railway Yard too


A hard pounding


A close up of Ade's lovely figures


My Artillery coming under fire


A side view of our impending doom


But wait, I managed to get around the flank


The British are wondering what to do


But on the other side the British were holding Jim and giving him a pounding too


My Artillery might get to fire


Oh oh....I lost one


Here I go on the flank.....but what do I do next? Oops I didn't write more specific orders


The British get their orders in the nick of time


Jim pushes forward


Jim getting shot at a lot


Still moving on the flank


Jim still trying to go forward despite heavy losses


I am almost there to outflank the British


Our C.O. and Runners duck for cover


The British make a hasty retreat


Where did they go?????


There they are...


Jim's dwindling line


I am set up for an assault but there is no enemy to hack to pieces.....


The British have made it safely to the next line of defence/


This is my Kitchen Table with my scenery on


My Village


My German Cavalry and Infantry weaving up the road 


Jim's British on the move


Jim spreading out


Me.....not spreading out


Jim's Dismounted Cavalry shoots at my Mounted Cavalry


And kills 1 Troop


My Cavalry on the left getting shot at by HMG


Now the Artillery are having a go....


 And I lose another base of Infantry


I have to keep moving forward, as I wasn't expecting Jim to be out here... another lesson learned


And I lost some more Cavalry


Here is proof of Jim's 20, 10 dice roll


That HMG can't hit us


Oh yes they can


Side view of the Village fighting


And the other flank


 Two HMG's trade shots


And of course I lose


The British go into the houses on their left flank


And in the Centre


The German's might be pushing hard on the other flank


Shooting out of the building


And of course, I lost another one


We trade shots


And of course I lost again

That ended our practice game. We talked about some things we learnt and had a few practice rolls for assaults, as we hadn't had any in the two practice games.

Thanks Ade for introducing me to this game, I am going to have a lot of fun with this.

Until next time my friends,

Have Fun,

Paul